VM management tasks
In this section, we are going to look at some management capabilities for virtual machines. We will explore items such as VM sizing, data disks, networking, moving VMs, redeploying VMs, disk encryption, availability sets and zones, scales sets, and configuration management automation.
Managing VM sizes
After creating your VM, you can manage and change (vertically scale) the sizes of Windows and Linux VMs from the Azure portal, PowerShell, and the CLI. Vertical scaling, also known as scale-up and scale-down, means increasing or decreasing VM sizes in response to different workloads.
In the following demonstration, we will explore how to change the VM size of your VM:
- Sign in to the Azure portal: https://portal.azure.com/home.
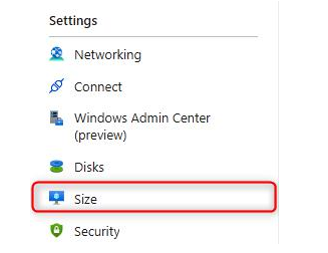
- Navigate to the VM you created in the previous exercise. On the left menu, under the Settings context, you will see a Size button – click this:

Figure 10.11 – VM Size setting
- Note that you are presented with several virtual machine options to choose from. You also will note there is a filter bar above the VMs that allows the viewing of VMs against the configuration you choose. Click vCPUs : All, select 2, and click OK. You will see the options for VMs change:

Figure 10.12 – VM Size filter
- Click the Cost/month filter button. You will notice this changes the sorting for the list. The default sorting is smallest to largest. Clicking this button again will reverse the order:

Figure 10.13 – VM Size selection
- Click D2s_v3 and click Resize.
You have successfully resized your VM. You now know how to manage VM size as needed. In the next section, we will explore the process behind adding data disks.
Top Tip
VM sizes that contain an “s” at the end of the size component typically support premium SSD storage; for example, D2s_v3.
Now that you have seen how to resize a VM using the Azure portal, we will explore how to perform this action through the CLI.
Resizing a VM using the CLI
You can also resize your VM using the CLI. You can run CLI scripts from Azure Cloud Shell or from your local filesystem. You can use Azure Cloud Shell for PowerShell scripts and commands as well. We are going to resize the VM from Azure Cloud Shell using the CLI in this demonstration.
To resize a VM using the CLI, you will perform the following steps:
- Navigate to the Azure portal by opening https://portal.azure.com/home.
- Open Azure Cloud Shell by clicking the following menu item in the top-right menu in the Azure portal:

Figure 10.14 – Opening Azure Cloud Shell
- Make sure that the Bash shell is selected.
- Add the following line of code to list the different available machine sizes for your region:
az vm list-vm-resize-options –resource-group PacktVMResourceGroup –name myVM1 –output table
- To resize your VM to a different size, add the following line of code. If the size is not available, you can replace the required VM size with one that is available for your subscription or region:
az vm resize –resource-group PacktVMResourceGroup –name myVM1 –size Standard_DS3_v2
We have now resized our VM using the Azure portal and the CLI. In the next section, we are going to work on adding data disks to a VM.
