PowerShell scripts
Please ensure that the Az module is installed as per the Technical requirements section at the beginning of the chapter.
In the next demonstration, we are going to create two Windows Server VMs from PowerShell and place them in an Availability Set. To do so, you will perform the following steps:
Note: Change the parameters to suit your requirements.
- First connect your Azure account using your credentials Connect-AzAccount
- Parameters
$ResourceGroup = “AZ104-Chapter10”
$Location = “WestEurope”
$SubscriptionId = “xxxxxxx”
$AvailabilitySetName = “PacktVMAvailabilitySet”
$VirtualNetworkName = “PacktVnet”
$SubnetName = “PacktSubnet”
- If necessary, select the right subscription as follows Select-AzSubscription -SubscriptionId $SubscriptionId
- Create a resource group for the Availability Set as follows
New-AzResourceGroup -Name “$ResourceGroup” -Location “$Location”
- Create an Availability Set for the VMs New-AzAvailabilitySet `
-Location “$Location” `
-Name “$AvailabilitySetName” `
-ResourceGroupName “$ResourceGroup” ` -Sku aligned ` -PlatformFaultDomainCount 2 ` -PlatformUpdateDomainCount 2
- Setup Your VM Admin Credentials
$adminUsername = ‘Student’
$adminPassword = ‘Pa55w.rd1234’
$adminCreds = New-Object PSCredential $adminUsername,
($adminPassword | ConvertTo-SecureString -AsPlainText -Force)
- Deploy 2 VMs Inside the Availability Set for ($vmNum=1; $vmNum -le 2; $vmNum++)
{
New-AzVm `
-ResourceGroupName “$ResourceGroup” ` -Name “PacktVM$vmNum” `
-Location “$Location” `
-VirtualNetworkName “$VirtualNetworkName” ` -SubnetName “$SubnetName” ` -SecurityGroupName “PacktNetworkSecurityGroup” `
-PublicIpAddressName “PacktPublicIpAddress$vmNum” ` -AvailabilitySetName “$AvailabilitySetName” ` -Credential $adminCreds
}
In these last two demonstrations, you have created a VM using the Azure portal and deployed two VMs inside an Availability Set using PowerShell. In the next section, we are going to cover deploying scale sets.
Deploying and configuring scale sets
To create a VM scale set from the Azure portal, take the following steps:
- Navigate to the Azure portal by opening https://portal.azure.com/home.
- Click on Create a resource and type in Scale Set in the search bar. Select Virtual machine scale set.
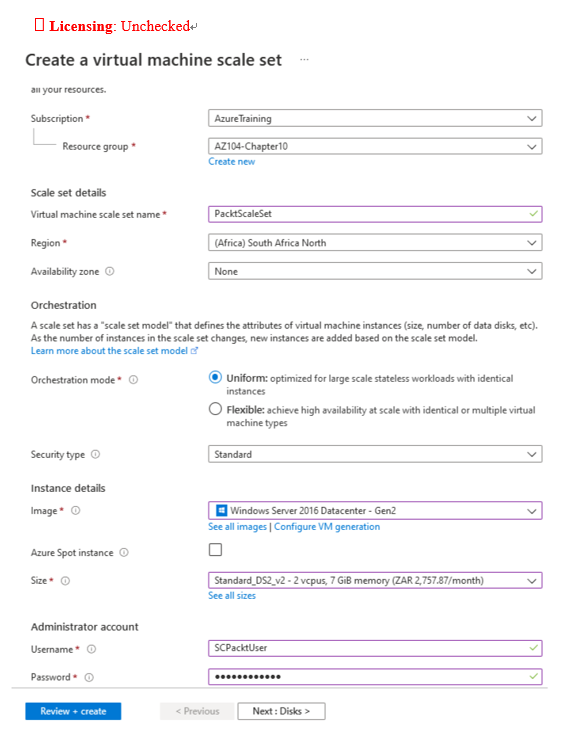
- On the next screen, click on Create and add the following settings to create the scale set:
Subscription: Select a subscription
Resource group: PacktVMGroup
Virtual machine scale set name: PacktScaleSet
Region: East US
Availability zone: None
Orchestration mode: Uniform
Security type: Standard
Image: Windows Server 2016 Datacenter – Gen 2
Size: Standard_DS2_v2
Username: SCPacktUser
Password: Add a password
Licensing: Unchecked

Figure 10.9 – Creating a scale set
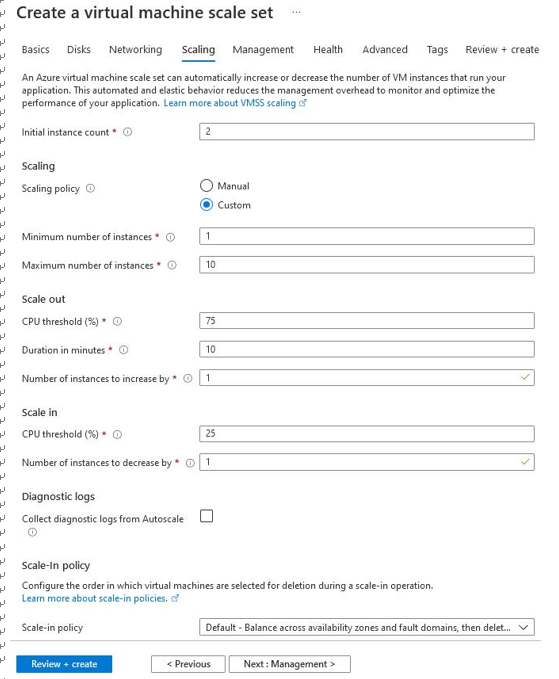
- If you click the Scaling tab, you can configure the autoscale settings. You can configure Initial instance count, Scaling policy, and Scale-in policy:

Figure 10.10 – Configuring a scale set
- Click Review + create, then click Create. The scale set with the number of provided VMs in it is now deployed.
You have now covered how to deploy a VM scale set. In the next section, we will explore the various VM management tasks that we need to be aware of.
