Disk encryption in Azure
Encrypting Azure disks ensures that unattended and unauthorized access to the disks will be prevented by encrypting the data. This can be done at bothan infrastructure level, through server-side encryption (SSE), and at an operating system (OS) level too, through Azure disk encryption (ADE).
SSE is the encryption of data stored on Azure managed disks when persisting to the cloud.
ADE provides a mechanism to safeguard and protect your data. It is zone resilient just like Azure VMs. In Windows, the encryption is done through BitLocker in the Windows OS with the option to store the encrypting key in Key Vault. The same is true for Linux with the utility for encryption being DM-Crypt.
In the following exercise, we are going to explore how to encrypt an Azure Windows VM.
Configuring ADE
We will now walk through the steps involved in performing ADE. This will be performed on a Windows VM:
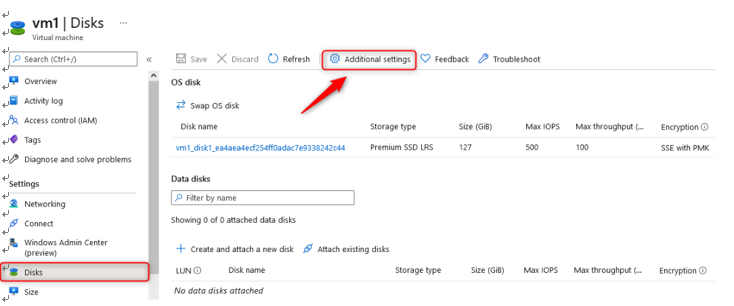
- Navigate to your VM in the Azure portal and select the Disks option on the left-hand menu. Click on Additional settings:

Figure 10.39 – Additional settings
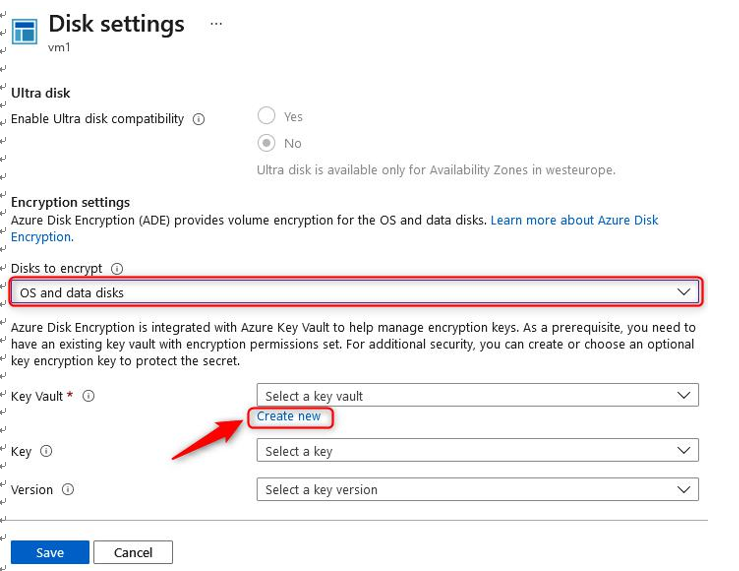
- Configure for OS and data disks and click Create new in the Key Vault section:

Figure 10.40 – Encryption disk settings
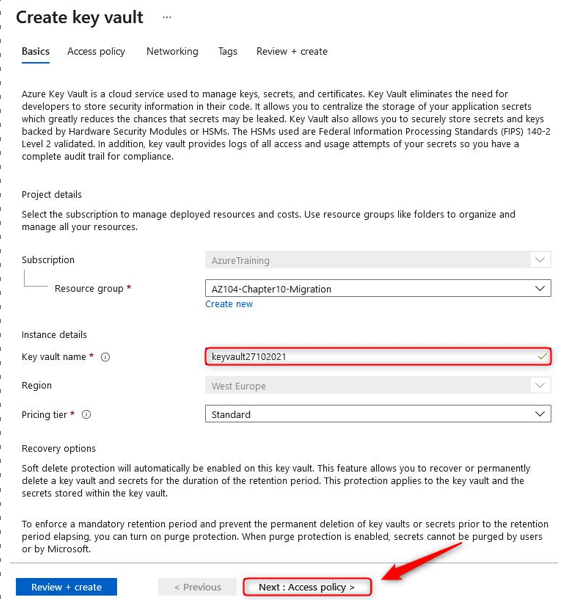
- Enter a name in the Key vault name field and click Next : Access policy >:

Figure 10.41 – Create key vault – Basics
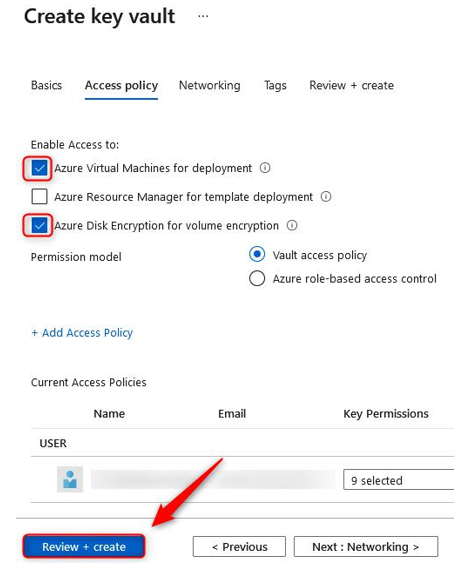
- Select the checkboxes next to both the Azure Virtual Machines for deployment and Azure Disk Encryption for volume encryption options. Click Review + create:

Figure 10.42 – Create key vault – Access policy
- Click Create.
- Note that your disk is now encrypted:

Figure 10.43 – Disks pane
You have completed the disk encryption exercise and now understand how to perform this operation within Azure. In the next section, we will discuss the reliability and availability options available to us in Azure.
Automating configuration management
There are various ways in Azure to automate the creation and configuration of your infrastructure. You can use ARM templates to deploy your infrastructure as code or use Azure Automation, PowerShell scripts, and more. When different Azure resources are deployed, there are some tools that you can use to manage the configuration of the resources. For example, when you want to automate the configuration of your VMs, Azure provides the following tools:
• Chef: Chef is a third-party solution that offers a DevOps automation platform for Linux, Windows, and macOS devices. It can be used for virtual and physical server configurations. It requires an agent to be installed on the virtual machines or servers, which connects to the Chef server to check whether there are available updates and other configurations for the machines. You can use the Chef Automate platform to package and deploy applications as well.
• Puppet: Puppet is a third-party solution as well, and it has similar capabilities to Chef. You can enable support for Puppet when you create a virtual machine from the Azure portal automatically. You can add it as an extension when you create a new virtual machine that installs the Puppet agent and connects to the master server. Although the Puppet agent supports Windows and Linux, the Puppet VM extension on Azure is supported on the Linux operating system only.
• Desired State Configuration (DSC): DSC is the process of forcing a configuration on a system. It uses configuration files that consist of PowerShell scripts. These scripts are responsible for doing the required configurations for the system and for ensuring that these systems stay in sync. So, for example, when you have created a DSC file to configure IIS on a Windows server and it is removed by an administrator, the DSC file will reinstall and configure IIS again. This can be used in conjunction with Azure Automation for enhanced reporting.
• Custom Script Extensions: You can configure software installation tasks and various post-deployment, configuration, and management tasks using Custom Script Extensions. Scripts can be downloaded from Azure Storage or GitHub, or provided to the Azure portal at extension runtime, and are executed on the VMs. You can integrate Custom Script Extensions with ARM templates, and you can run them using PowerShell, the CLI, the VM REST API, and the Azure portal.
Summary
In this chapter, we covered Azure VMs, how to configure them, and the various management functions, including components such as networking, high-availability configurations, and changing the VM host. As part of this topic, we unpacked the various types of Azure disks that exist, how these can be added to a VM, and how we can encrypt the disks.
You have now attained the skills required for the management of VMs within the Azure environment and should be able to confidently provision, scale, and manage these going forward. You have also learned different methods of deployment to assist you with consistent delivery on the platform while ensuring fewer mistakes and faster deployment times than doing this manually, using PowerShell or the Cloud CLI. Alongside these skills, you also know the various storage options available, how to best scope the storage required, and how to implement this as needed.
In the next chapter, we will cover Azure containers and how to configure and manage them.
