Configuring container groups for Azure container instances
For this exercise, we are going to configure an Azure container group using an ARM template and Azure Cloud Shell using the following steps:
- Sign in to the Azure portal at https://portal.azure.com.
- On the top menu bar, click the Cloud Shell icon, as illustrated in the following screenshot:

Figure 11.32 – Azure icons
- Type code azuredeploy.json and press Enter. You may resize the screen on the highlighted points shown in the following screenshot:
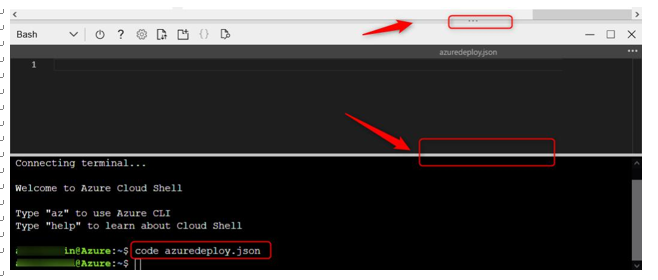
Figure 11.33 – Azure Cloud Shell
Alternatively, you could also select Open a new session, which will open a shell in a new browser tab. You can see the icon for this in the following screenshot:

Figure 11.34 – Azure Cloud Shell: Open a new session icon
- In the top section of the window, paste the following code and then click the ellipsis (…) on the top right and click Save:
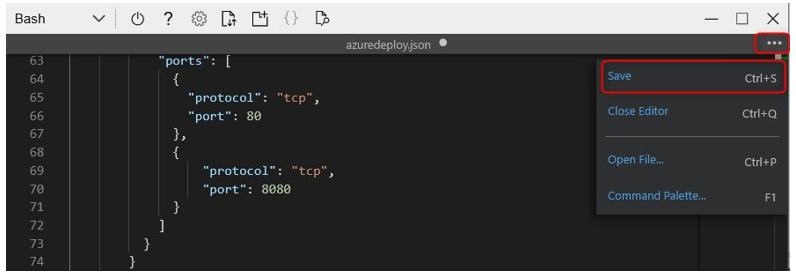
Figure 11.35 – Azure Cloud Shell: Visual Studio Code (VS Code)
The following code snippet contains the ARM template code for deploying your container instances:
{
“$schema”: “https://schema.management.azure.com/ schemas/2019-04-01/deploymentTemplate.json#”,
“contentVersion”: “1.0.0.0”,
“parameters”: {
“containerGroupName”: {
“type”: “string”,
“defaultValue”: “myfirstcontainergroup”,
“metadata”: {
“description”: “My First Container Group”
}
}
},
“variables”: {
“container1name”: “aci-tutorial-app”,
“container1image”: “mcr.microsoft.com/azuredocs/ aci-helloworld:latest”,
“container2name”: “aci-tutorial-sidecar”,
“container2image”: “mcr.microsoft.com/azuredocs/ aci-tutorial-sidecar”
},
“resources”: [
{
“name”: “[parameters(‘containerGroupName’)]”,
“type”: “Microsoft.ContainerInstance/ containerGroups”,
“apiVersion”: “2019-12-01”,
“location”: “[resourceGroup().location]”,
“properties”: {
“containers”: [
{
“name”: “[variables(‘container1name’)]”,
“properties”: {
“image”: “[variables(‘container1image’)]”,
“resources”: {
“requests”: {
“cpu”: 1,
“memoryInGb”: 1.5
}
},
“ports”: [
{
“port”: 80
},
{
“port”: 8080
}
]
}
},
{
“name”: “[variables(‘container2name’)]”,
“properties”: {
“image”: “[variables(‘container2image’)]”,
“resources”: {
“requests”: {
“cpu”: 1,
“memoryInGb”: 1.5
}
}
}
}
],
“osType”: “Linux”,
“ipAddress”: {
“type”: “Public”,
“ports”: [
{
“protocol”: “tcp”,
“port”: 80
},
{
“protocol”: “tcp”,
“port”: 8080
}
]
}
}
}
],
“outputs”: {
“containerIPv4Address”: {
“type”: “string”,
“value”: “[reference(resourceId(‘Microsoft. ContainerInstance/containerGroups/’, parameters(‘containerGroupName’))).ipAddress.ip]”
}
}
}
- Now, type in the following code to deploy the ARM template:
az deployment group create –resource-group AZ104-Chapter11 –template-file azuredeploy.json
Press Enter. This will take a few minutes to run and will show the following output:

Figure 11.36 – ARM template deployment
- Once your deployment has completed, you can close the Cloud Shell window by clicking the cross on the top-right bar, as illustrated in the following screenshot:
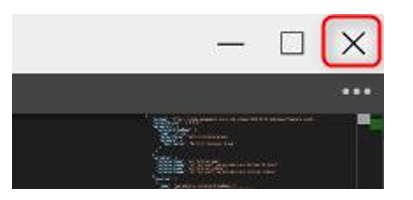
Figure 11.37 – Closing VS Code
Navigate to the resource group where you deployed your container group. Open the container group resource by clicking on it. On the Overview pane, note the public IP address and that you have two containers. Copy the IP address to your browser, and note that you can connect to the site where your container group is functional, as illustrated in the following screenshot:

Figure 11.38 – Container group public IP
- Click on the Containers menu option on the left pane and note your two containers are deployed to the container group, as illustrated in the following screenshot:

Figure 11.39 – Container group: Containers
You have just successfully deployed your first container group in Azure. In the next section, we will explore how to manage the sizing and scaling of your deployed container instances.